Wireless Broadband Support
Wireless Broadband FAQ

Wireless Broadband
Wireless broadband operates off local network masts in your area, similar to how a mobile phone operates. The router receives a signal from the SIM card, which connects to the local masts. This type of broadband is ideal for rural areas where fibre may not be available yet due to the lack of fixed line connections.
Several reasons could cause your internet to stop working, including issues with the local mast (your mobile may be affected too) or a recently reset router losing its settings. If your internet isn’t working, check the APN settings by selecting your router below and following the provided steps in the APN guide.
Our wireless broadband is fully mobile, so you can simply unplug the router and take it with you to your new location anywhere in the Republic of Ireland. If you experience a difference in service quality at your new location, contact us, and we can provide you with a new SIM connected to a different mast. Don’t forget to update your address with us to keep your records current.
Start by restarting your router, turning it off and on again. Then check the router settings to ensure they’re optimal by following the provided steps in the APN guide of your router. If the issue persists, contact us, and we can refresh your SIM. If congestion is causing the slowdown, we may need to consider alternative network options.
Network congestion occurs when there’s excessive traffic on the internet, leading to slowdowns or disruptions. This commonly happens during peak times, such as in the evening when many users are online simultaneously.
Router FAQ

Tenda 4G680
Find the Tenda 4G680 router user guide here.
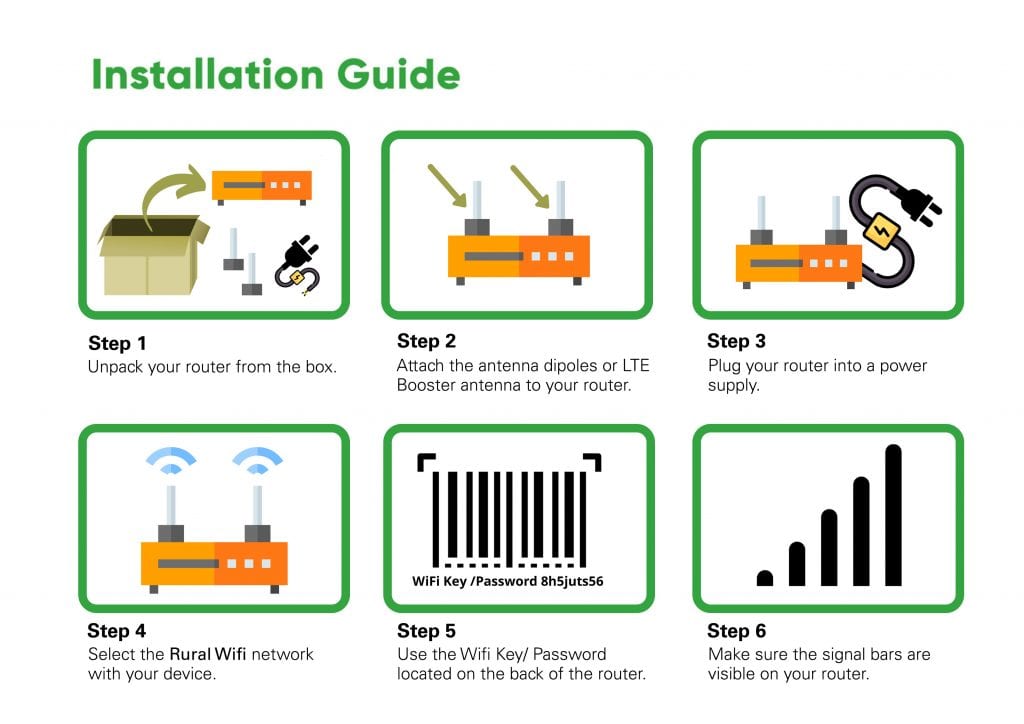
To install your wireless broadband router, follow these simple steps.
The standard password on all our routers is “ruralwifi”, which can be changed and is recommended for increased security on your network.
1 – Connect to your router using your device. The Password should already be “ruralwifi”.
2 – Type 192.168.0.1 into the address bar of your preferred internet browser.
NB – Make sure you type it into the search bar at the top.
3 – There is a login screen with the password as “rwcadmin”. After successfully logging in, go to Wi-Fi Settings, then select the Wi-Fi Name & Password
3 – Select “Encryption Mode” and pick the recommended option (WPA/WPA2-PSK)
4 – Type a new password in the “Wi-Fi Password” field, then click “Save”.
You can find instructions on how to change your APN in our Tenda APN Guide

Tenda 4G09
Find the Tenda 4G09 user guide here.
To install your wireless broadband router, follow these simple steps.
The standard password on all our routers is “ruralwifi”, which can be changed and is recommended for increased security on your network.
1 – Connect to your router using your device. The Password should already be “ruralwifi”.
2 – Type 192.168.0.1 into the address bar of your preferred internet browser.
NB – Make sure you type it into the search bar at the top.
3 – There is a login screen with the password as “rwcadmin”. After successfully logging in, go to Wi-Fi Settings, then select the Wi-Fi Name & Password
3 – Select “Encryption Mode” and pick the recommended option (WPA/WPA2-PSK)
4 – Type a new password in the “Wi-Fi Password” field, then click “Save”.
You can find instructions on how to change your APN in our Tenda APN Guide

TP-LINK MR600 4G
Find the TP-Link MR600 router user guide here.
To install your wireless broadband router, follow these simple steps.
To set a password on your router, first you will need to log in to the router settings.
1 – Open Google Chrome (or your preferred browser) and type the following IP Address 192.168.1.1 into the address bar.
2 – The next screen will ask you to either create or enter a password. The password is “admin” All lowercase and all one word.
3 – Go to the Advanced tab on the top right then on the new drop-down menu on the left select Wireless then “Wireless settings”.
4 – Here you can change the network name and password.
5 – Press save.
The router should reboot, and you will have to connect your devices again using the new password.
You can find instructions on how to change your APN in our TP-LINK APN Guide.

Huawei CPE Pro 2 5G
Find the Huawei CPE Pro 2 user guide here.
To install your wireless broadband router, follow these simple steps.
To change or set a password on your Huawei router, follow these simple steps:
1 – Connect your computer/phone to the router’s Wi-Fi (check the nameplate at the bottom of the router for the default Wi-Fi name, no password), or connect the computer to the router’s LAN port using an Ethernet cable.
2 – In the browser address bar, enter the default IP address (printed on the bottom of your router) and log in to the router’s web-based management page.
- You do not need to distinguish between WAN and LAN ports for routers that feature self-adaptive ports.
- If you are connecting your phone to the router’s Wi-Fi network, switch your phone’s webpage to the PC-based UI before performing the following operations.
4 – Go to More Functions > System Settings > Change Login Password.
5 – Enter your current password in the Current password field, enter your new password in the New password field, enter the new password again in the Confirm password field to confirm, and click Save.

TP-LINK 5G
Find the TP-link 5G user guide here.
To install your wireless broadband router, follow these simple steps.
To set a password on your router, first you will need to log in to the router settings.
1 – Open Google Chrome (or your preferred browser) and type the following IP Address 192.168.1.1 into the address bar.
2 – The next screen will ask you to either create or enter a password. The password is “admin” All lowercase and all one word.
3 – Go to the Advanced tab on the top right then on the new drop-down menu on the left select Wireless then “Wireless settings”.
4 – Here you can change the network name and password.
5 – Press save.
The router should reboot, and you will have to connect your devices again using the new password.
You can find instructions on how to change your APN in our TP-LINK APN Guide.
Sim Card FAQ

Sim Card
To insert your new SIM card, follow these simple steps:
1 – Unbox your new router and check where the SIM card goes. It is usually on the back or underneath the router.
2 – Next, remove the SIM card from your current router or if you received a new SIM card in the post, have a look at its size.
3 – There are 3 different sizes of SIM Card: mini, micro, nano. See what size the router takes and break down the SIM as needed. The router should tell you which size you require.
Your SIM card should break down by applying a bit of pressure and popping out of place.
4 – Once you have done this, all you need to do is insert the SIM into the router.
You will notice one corner of the SIM is cut. This is so you know which way the SIM goes into the device.
If you take a look back at your router, there will be a little picture of the SIM card next to where you insert the SIM. This picture shows the cut corner.
To put the SIM in, simply line the SIM in your hand up with the picture on the router so that the cut corner matches.
5 – Once the cut corners line up, insert the SIM into the slot. The slot is springboarded, so be careful inserting the SIM. Push the SIM in until you feel a small click.
6 – Now you can plug in and turn on your router. It will take a few minutes to recognise the new SIM.
If you have any issues, please do not hesitate to reach out and call our support team on 01 211 86 53 or email [email protected].
The APN (Access point Name) needs to be checked. Select your router above and follow steps in the APN Guide.
This can happen if the password has been entered incorrectly. Double-check your password is correct.
If the error is still occurring, the APN (Access point Name) needs to be checked. Select your router above and follow steps in the APN Guide.
Get In Touch